A picture speaks a thousand words… but only if it loads in time to be seen! Not only do images that take an age to load make for a bad customer experience and high bounce rates, image load speed is an important factor that Google takes into account when ranking your website.
So what can you do to optimise images for web display to ensure that your website loads as quickly as possible?
-
Size Matters…
When uploading an image to the web, we only need to upload it at the size at which it’s going to be displayed. Uploading a file of a larger size will take longer to load, only to be scaled down to fit the dimensions of the image space.
For example, if you’re uploading an image to be used as a 200 x 200 px thumbnail, there’s no point uploading a 4000 x 4000 px image for it only to load and be resized straight away. See below for a step by step guide on how to resize an image for web.
While there are a number of WordPress plugins that allow you to resize your images, I think the best way to resize images for web is using Adobe Photoshop.
When determining the size of an image for web display, we measure in pixels. A pixel is simply a single dot of colour in the image.
-
Save for Web
When resizing and optimising images for web, you want to make sure that image quality is preserved as best as possible. Using a programme like Photoshop allows us to reduce an image’s file size without reducing its quality significantly. So how do we ‘Save for Web’ in Photoshop?
Open your image in Photoshop and go to File > Export > Save for Web (Legacy)…. From here you can decide the quality at which you want to export the image (you can also adjust the image size here). When reducing the file size of an image it is a balancing act between reducing the quality enough to allow fast load times but not too much so as to reduce the image’s quality too much.
Setting the preset to ‘JPEG Medium’ and reducing the dimensions of the image, usually looks great.
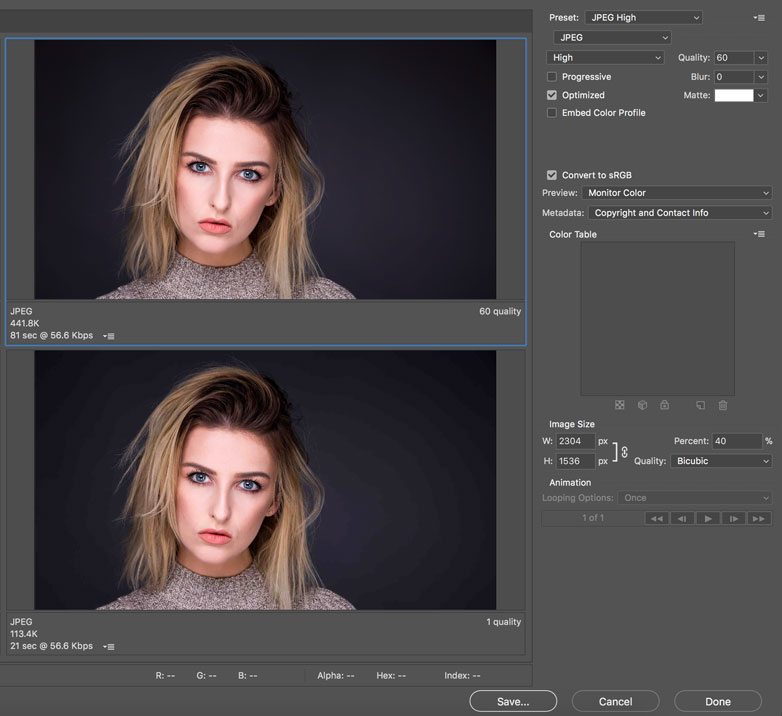
Here’s an example of what can happen when you compress an image too much. The first is using an exaggerated amount of compression, resulting in a very low-quality image but smaller file size. The second image is using a very little compression, resulting in a higher quality image but larger file size. The goal is to find a happy medium between the two.

-
Set your colour space
A colour space is simply a specific range of colours that can be represented in a given photo. Most photographers use the colour space Adobe RGB as this contains the largest colour range, however almost everything on a computer is built around sRGB which contains less colours.
This all sounds quite technical, but all you need to remember is to make sure you convert images to the sRGB colour space before uploading to web. This will prevent your images from looking ‘duller’ than expected
-
Remove Exif Data
When a photo is taken, along with the saving the image itself, the camera also saves a range of technical settings such as date, time, camera model. ISO, shutter speed & aperture etc.
When optimising images for web display this information is not needed so we can delete it prior to uploading. We can compress an image file in this way by using an application like ImagOptim. Simply drag & drop an ImagOptim will delete all of the invisible junk stored within your image file.
-
File Type
Before you start modifying your images, make sure you’ve chosen the best file type. There are several types of files you can use:
- JPEG – is best in most cases. You can adjust the quality level for a good balance of quality and file size.
- PNG – produces higher quality images, but also has a larger file size.
- GIF – is the best choice for animated images.
Follow these 5 steps and say goodbye to slow page loads! Good imagery is crucial to making your website look great – see our blog on ‘What Makes a Website Beautiful?‘ for more great design ideas to make your website stand out!

